 I did so because the setting is so reminiscent of small black and white images of my childhood. sitting on the same pebble beach a few miles up the coast in Hove. My grandmother, clad in thick coats and scarfs whatever the weather, my brother and I running in and out of the sea, whatever the weather. Last weekend our friends took us down to the beach. Yes, it rained, yes, it was occasionally windy but, as is so often the case in England, we stuck it out. The sun emerged, the children swam and we ate Asian inspired BBQ. Delicious fish on skewers, steamed asparagus marinated in olive oil, fish and soy sauce, but the squid deserves special comment. Again steamed in foil parcels, the squid had been marinated in a little oil, chilli, fish sauce and soy sauce, with the addition of spinach. Chris steamed these over the BBQ for no more than five minutes. We could have been on a beach in Indonesia... well almost.
Thursday 19 June 2014
Beach BBQ Worthing style
I could not resist the temptation of posting this blog picture in black and white. I did so because the setting is so reminiscent of small black and white images of my childhood. sitting on the same pebble beach a few miles up the coast in Hove. My grandmother, clad in thick coats and scarfs whatever the weather, my brother and I running in and out of the sea, whatever the weather. Last weekend our friends took us down to the beach. Yes, it rained, yes, it was occasionally windy but, as is so often the case in England, we stuck it out. The sun emerged, the children swam and we ate Asian inspired BBQ. Delicious fish on skewers, steamed asparagus marinated in olive oil, fish and soy sauce, but the squid deserves special comment. Again steamed in foil parcels, the squid had been marinated in a little oil, chilli, fish sauce and soy sauce, with the addition of spinach. Chris steamed these over the BBQ for no more than five minutes. We could have been on a beach in Indonesia... well almost.
I did so because the setting is so reminiscent of small black and white images of my childhood. sitting on the same pebble beach a few miles up the coast in Hove. My grandmother, clad in thick coats and scarfs whatever the weather, my brother and I running in and out of the sea, whatever the weather. Last weekend our friends took us down to the beach. Yes, it rained, yes, it was occasionally windy but, as is so often the case in England, we stuck it out. The sun emerged, the children swam and we ate Asian inspired BBQ. Delicious fish on skewers, steamed asparagus marinated in olive oil, fish and soy sauce, but the squid deserves special comment. Again steamed in foil parcels, the squid had been marinated in a little oil, chilli, fish sauce and soy sauce, with the addition of spinach. Chris steamed these over the BBQ for no more than five minutes. We could have been on a beach in Indonesia... well almost.
Friday 13 June 2014
Dom's number one chicken

Today's offering has been marinating in olive oil and lime juice with mustard seeds, garlic, chilli, cumin and fenugreek all afternoon. It was cooked for about 45 minutes over coals and served with a couscous salad. Best of all enjoying a beer at the end of the garden while it cooks.
Thursday 5 June 2014
Scorpion pasta
I have been making this for about 20 years and is a regular fall back when everyone is hungry and starting to prowl around the kitchen looking hopefully into an apparently empty fridge. I suspect most families have a variation of this. You need:
Why scorpion pasta? It's what Rowan used to call it when he was little. I loved his sense of the exotic, not least because I am pretty sure he had never seen a scorpion, while prawns were regularly on the menu!
- streaky bacon
- a pack of uncooked or cooked prawns. I like the large ones but any size will do.
- about 2cm of root ginger sliced into thin match sticks
- three cloves of garlic thinly sliced
- olive oil
- crème fresh
- grated parmesan.
- some cooked peas
- For the pasta, I think this works best with tagliatelle.
Why scorpion pasta? It's what Rowan used to call it when he was little. I loved his sense of the exotic, not least because I am pretty sure he had never seen a scorpion, while prawns were regularly on the menu!
Wednesday 4 June 2014
Stretching for the Elderflower
 After a month or two break, I have found that I have a
backlog of recipes that I want to post.
I am going to start with something that I have never made until about two weeks ago. Which is somewhat contrary to my stated aim for this blog of posting family favourites. But I think I should be forgiven when it comes to elderflower cordial.
After a month or two break, I have found that I have a
backlog of recipes that I want to post.
I am going to start with something that I have never made until about two weeks ago. Which is somewhat contrary to my stated aim for this blog of posting family favourites. But I think I should be forgiven when it comes to elderflower cordial.
As with all good recipes, first collect your elderflowers.
At this time of year they hang tauntingly over pretty much ever fence and
hedgerow. In our south London suburb they all seemed to be just out of my reach. So the
task of collecting around 25 large heads of elderflower, mainly in flower or in
bud but not yellowing, involved me going out on a sunny morning, putting the roof down on my car, parking under a suitable tree and standing on tiptoes on the back of the car then hooking down the best looking flower heads. It was subsequently pointed out to me that my cool, urban women about town reputation was destroyed as various neighbours drove past as I was doing this.
I read about six
different recipes for elder flower cordial and was amazed by the different amounts of sugar they
suggested. From 250 grams to 2 kilos for basically the same amount of flowers
and water. I suspect the difference in the end result is largely the thickness
of the concentrate but I used 250 grams and I wouldn't want it any sweeter.
Strip the flowers from the storks and carefully removed any insects. Next pour about 2 litres of just boiled water over the flower heads and leave it overnight. The next day I used muslin to filter the liquid from the flowers, added the juice of two lemons and 250 grams of caster sugar and boiled for a couple of minutes, before allowing it to cool and bottling the cordial.
It was as easy as that and resulted in a cordial that everyone loves. It will keep for a few weeks but also freezes well.
Tuesday 11 February 2014
Alpina inspired apple studel
 One of my earliest memories of childish independence was
being allowed to walk with my brother to a parade of shops about five minutes
away from our house. There was a little
bakery/café at the end of the parade called the Alpina. Run by a smiley Swiss women, I remember cuckoo clocks, pine tables, benches and pictures of snowy alps. Did the staff wear lederhosen and have long
blond plaits? Probably not, but for the purposes of my memory they certainly
did. Hot chocolate and apple strudel was my order
of choice. It never occurred to me to
try and construct a pastry of such complexity as an apple strudel, layers flaky,
crunchy and chewy all at the same time.
It never occurred to me, that is, until I bought a book for Giselle when
she was about six. “Cooking with kids” by Linda
Collister. It not only had a recipe but had
one of those wonderful step by step set of pictures. I realised that maybe this cake was not
beyond me. A few weeks ago I found
myself driving through my old town, the parade of shows is still there and to
my utter amazement so was the Alpina.
Next time I am down that way I will be paying a visit. This is how I
make apple strudel.
One of my earliest memories of childish independence was
being allowed to walk with my brother to a parade of shops about five minutes
away from our house. There was a little
bakery/café at the end of the parade called the Alpina. Run by a smiley Swiss women, I remember cuckoo clocks, pine tables, benches and pictures of snowy alps. Did the staff wear lederhosen and have long
blond plaits? Probably not, but for the purposes of my memory they certainly
did. Hot chocolate and apple strudel was my order
of choice. It never occurred to me to
try and construct a pastry of such complexity as an apple strudel, layers flaky,
crunchy and chewy all at the same time.
It never occurred to me, that is, until I bought a book for Giselle when
she was about six. “Cooking with kids” by Linda
Collister. It not only had a recipe but had
one of those wonderful step by step set of pictures. I realised that maybe this cake was not
beyond me. A few weeks ago I found
myself driving through my old town, the parade of shows is still there and to
my utter amazement so was the Alpina.
Next time I am down that way I will be paying a visit. This is how I
make apple strudel. - 200g of readymade filo pastry
- 9 amoretti biscuits
- 4 good eating apples
- 50g of caster sugar
- 2 teaspoons of cinnamon
- 75g of butter
- 3 table spoons of Sarah’s mincemeat (see earlier blog post) or if you don’t have any use 3 table spoons of raisins.
- Icing sugar
Carefully transfer your strudel onto a greased baking tray
and bake for about 30 minutes in a preheated oven (200 degrees C). When it is ready the pastry will be golden
brown. Dust with icing sugar and serve
with a flourish.
Thursday 6 February 2014
Chittarni
Today, I have a guest post from my father. This is a recipe
that he had told me about but only as a memory from his childhood. We cooked it together a few days ago and I will
certainly be introducing it to the rest of the family. I have found another recipe for this in Copeland Marks', The varied kitchens of India which has a chapter on the food eaten by the Jews of Calcutta. It was almost exactly the same as this one except that he uses tamarind paste rather than vinegar. I wonder if the vinegar was added by my great grandmother and others finding themselves transplanted in England, as an alternative, since tamarind must have been pretty tricky to come by in England in 1941!
Guest post
"My first recollection of the dish called
chittarni which we put together today is specific. It was during
World War II. My Grandmother (Big Granny) was staying with us in Sidmouth,
Devon, where we occupied a flat on the sea front. The dish was a favourite
of Granny's because one of her daughters had cooked some for her at home in
London, and sent it to her by post. It consisted of pieces of
chicken stewed in a smooth and richly spiced onion
sauce to which tomatoes had been added and which is sharpened by vinegar.
The sauce you could tell both preserved and enhanced the chicken. It arrived in
one or two glass jars. I have never forgotten its smell and its
sweet and sour taste. Nor my greed in wanting to eat it then and there as
Granny unpacked her parcel even though I knew that it was meant to be
warmed up and was intended as a treat for her and not for
me. Treats were in short supply in 1941. I have thought of that
day but did nothing about trying to recreate the experience, until I
discovered its recipe in the Sephardi section of Claudia
Roden's brilliantly researched Book of Jewish Food.
Here's how you cook it. You need a lot of onions which slow
cooking melts down - two Kilograms, say six large ones. In the old days
you would grate them or chop them very fine. Fortunately adding the
onions coarsely chopped to a food processor will quickly give
you a large bowl without tears or too much effort. The onions should then
be slowly softened in oil in a large pan with the lid on and stirred from
time. This may take half an hour or more. The onions should on no account be
allowed to brown.
While the onions are cooking prepare the spices. You will
need: several cloves of garlic mashed into a paste, a generous
portion of grated ginger, a teaspoon of turmeric, a teaspoon of
ground cinnamon, 1 and half teaspoons of ground coriander. ground cardamom,
chili powder and a couple of bay leaves. I leave some of these amounts open to
allow for taste preferences. Add these spices and cook slowly for five minutes
stirring from time to time. Add chicken pieces, thighs on or off the bone and sauté for a few minutes.
Now add a can of chopped tomatoes and simmer uncovered for
30 minutes or until the liquid is absorbed. Finally stir in a three of four
tablespoons of wine vinegar according to taste. I find that this sour element
is very important to the final balance of taste. Cook for a further 10 minutes.
It gives me pleasure to think Dear Pippa that the
dish which we had for lunch and which your bother Toby ate the same day
when he came to stay the night, should bring so long a strand of memory leading
to your great grandmother and to a seaside flat in wartime England. A
true family recipe I suppose."
Wednesday 5 February 2014
Giselle’s chocolate and raspberry brownies
 Today’s recipe comes from Giselle. These chocolate brownies really are the best I have ever tasted. As well as baking them at home she used to make them for the local café where she worked at weekends when she was at school.
 - 300g of dark chocolate
- 50 g of milk chocolate
- 225 g of double cream
- 2 tablespoons of espresso coffee
- 3 large eggs
- 225g caster sugar
- 1 teaspoon of vanilla essence
- 75 g of self-raising flour
- About 150g of raspberries
- 100g of milk chocolate broken into chunks
Preheat the oven to 190 degrees, grease and line with greaseproof paper a large square tin. Melt the chocolate and cream in a bowl over a pan of hot water, stir occasionally until it is melted and glossy. Allow it to cool a little.
In another bowl mix together the coffee eggs, sugar and vanilla essence. Slowly beat in the chocolate mixture. Fold in the flour, the raspberries and milk chocolate chunks and then pour the mixture into the tin. Bake for about 40 minutes, the brownies should have a soft centre.
Tuesday 4 February 2014
Chorizo hash
Today I am posting a very simple meal which everyone loves. I think I first discovered this in an Italian restaurant in Clapham about 20 years ago. I am not sure if I remembered or copied it correctly but this is the way I have always done it.
The trick is to use good quality chorizo, a nice spicy one. We had it last night and the kids all fought over the crispy bits stuck to the bottom of the pan.
Put the potatoes into boiling salted water for about 5 minutes. You want them partly cooked. Slice the chorizo and garlic and cook with a little oil in a large pan. I use a paella pan. After about five minutes add the drained potatoes and sauté until the potatoes and sausage are cooked through and going a bit crispy. You need to keep moving them about in the pan. Finally add the broccoli and toss them in the potato chorizo mix and season with salt and pepper. Bring to the table and dig in.
- 4 or 5 spicy chorizo sausages.
- About 6 – 8 good sized potatoes sliced into 1cm chunks
- A large head of broccoli
- 2 large cloves of garlic thinly sliced.
Put the potatoes into boiling salted water for about 5 minutes. You want them partly cooked. Slice the chorizo and garlic and cook with a little oil in a large pan. I use a paella pan. After about five minutes add the drained potatoes and sauté until the potatoes and sausage are cooked through and going a bit crispy. You need to keep moving them about in the pan. Finally add the broccoli and toss them in the potato chorizo mix and season with salt and pepper. Bring to the table and dig in.
Monday 3 February 2014
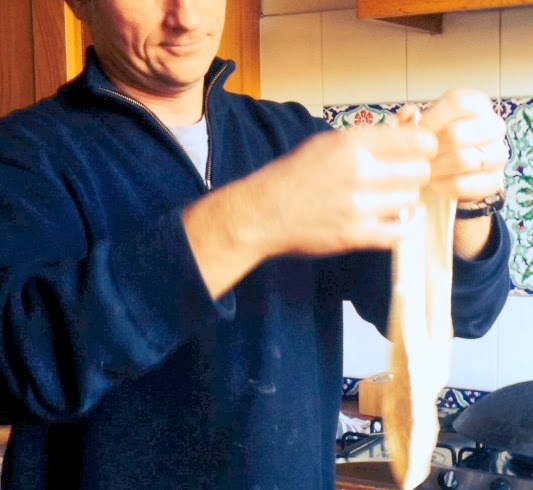
Bedouin Bread
Over the past year or so I have been making more and more bread. Every other day or so I make a sour dough or yeasted loaf but I suspect the breads my children like and will remember the most are the flat breads. I have already written a post on pita but today I thought I
 would write about Bedouin flat bread. This is Dominic’s recipe really since he was the one who persevered in finding an alternative to a saj (a kind of upside down wok that the Bedouin use to cook these breads) and he has experimented with different ratios of flour to water.

We discovered this unleavened flat bread a couple of years ago on holiday in Jordan. Whilst staying in a hotel owned and run by Bedouin we visited a woman who made flat breads for the hotel breakfast in her cooking tent. Whilst we did see modern gas powered saj’s, mostly these breads are cooked under an open wood fire giving them a lovely smoky taste.
- 4 cups of bread flour
- 2 ½ cups of water
.JPG)
Mix into a dough and kneed for about 10 minutes until soft. Split the dough into balls a little bigger than a golf ball. Cover with a damp tea towel and leave for about 10 minutes to rest. Roll out the first ball using a rolling pin and adding flour to avoid it sticking. Pick up the dough and stretch it out gently until the bread is paper thin. Carefully spread it on the saj and leave for just a few seconds. Turn the bread over and cook the other side for the same amount of time.
You can fill the bread like a wrap, dip it in hummus and soups or simply rip it up and eat it plain.
Friday 31 January 2014
Sally's stuffed pancakes
This unashamedly 1970’s dish was made by my mother when I was a child. I suspect she got it originally from Delia Smith. I have added a few bits and pieces over the years and this is now one of my favourite stand-bys. I sometimes make half with spinach and half without, to appease any children who still resist the idea of too much ‘green’.
Gently fry the onion and garlic in a little oil for about 10 minutes, make sure they are well cooked and transparent but not brown. Add the tomatoes and basil and season with some salt and pepper. Let this cook with a lid on for about 30 minutes.
Steam the spinach for a few minutes until it is wilted and soft. Squeeze any excess water out and chop up. Add about 3 teaspoons of spinach and the same of cottage cheese onto a pancake. Grate a good sprinkling of nutmeg and roll the pancake up into a fat cigar. Line the stuffed pancakes in an oven proof dish and pour over the tomato sauce. Cook the dish for about 40 minutes at 180 degrees. Sprinkle a bit more basil on the top before serving.
- 8 pancakes (made with 1 egg, half milk half water and a pinch of salt)
- A large tub of plain cottage cheese
- About 400g of spinach
- Two tins of chopped tomatoes
- Two onions finely chopped
- Two cloves of garlic
- About 2 tables spoons of fresh chopped basil
- Grated nutmeg
Gently fry the onion and garlic in a little oil for about 10 minutes, make sure they are well cooked and transparent but not brown. Add the tomatoes and basil and season with some salt and pepper. Let this cook with a lid on for about 30 minutes.
Steam the spinach for a few minutes until it is wilted and soft. Squeeze any excess water out and chop up. Add about 3 teaspoons of spinach and the same of cottage cheese onto a pancake. Grate a good sprinkling of nutmeg and roll the pancake up into a fat cigar. Line the stuffed pancakes in an oven proof dish and pour over the tomato sauce. Cook the dish for about 40 minutes at 180 degrees. Sprinkle a bit more basil on the top before serving.
Thursday 30 January 2014
Banana Loaf
 I made this cake last night because I discovered three black banana’s at the bottom of the fruit bowl. Over the years I have tried loads of different banana cakes and breads but I always come back to this one. It is best if the bananas are really over ripe (a good week after the children have refused to go near them is a good rule of thumb). About half the loaf went into school today to sustain Josh through a water polo tournament. In the past I have added chocolate chips to the mix and think walnuts would make a good addition. However Josh is allergic to walnuts so I have never tried this.
 - 225 grams of self raising flour
- 100 grams of soft butter (it has to be really soft but not melted)
- 4 very ripe bananas
- 30 grams of soft dark sugar
- 4 table spoons of golden syrup
- 4 eggs
Use an eclectic whisk or food mixer to whiz up all the ingredients. Pour into a loaf tin. I use a silicon loaf tin which I don’t need to line or grease. If you don’t have one of these you need to grease the tin with butter and line it with grease proof paper.
Cook in a hot oven at 180 degrees for about 50 minutes. Check the oven after about 40 minutes, if it looks like it might burn cover it with a bit of silver foil and keep cooking.
Wednesday 29 January 2014
Sarah or Janie's mincemeat
Guest Post
My first guest post comes from Sarah. Sarah gave me this recipe at least 10 years ago and I have been making it every year since. I always try and make sure I don’t use it all at Christmas so that there is some left over to add to apple strudel (you will have to wait for that one). So over to SarahI’m actually making marmalade this morning, using the recipe off the side of the cardboard box that contained the Seville oranges!
The jam jars I will use for the marmalade were recently full of Christmas mincemeat. This is really easy to make and so much nicer than shop-bought mincemeat (I have a bit of a ‘thing’ about suet…) This recipe is one I’ve been repeating for about fifteen years now. In my handwritten recipe book, it has the heading ‘Janie’s mincemeat’. Janie is my twin sister who lives in Boston, USA, and tries to keep some English food traditions going in her family. I generally make it during the October half-term when Cox’s apples are cheap, or even free, if you know anyone with a few apple trees. This year, one of the big storms ripped through Suffolk during half term, leaving a deep circle of apples beneath each apple tree in my parents’ garden.
Janie’s mincemeat
- ¾ pint cider (or apple juice)
- 1lb soft brown sugar
- 4 lb Cox apples, peeled, cored and chopped into small pieces
- 1tsp mixed spice
- 1tsp cinnamon
- 1lb 4 oz currants
- 1lb raisins
- (4 oz preserved cherries – if you have them in the cupboard – or replace with raisins)
- grated, unwaxed lemon zest and juice of a lemon
- ¼ pint Brandy
Dissolve the sugar slowly in the cider/apple juice and then add the rest of the ingredients except for the brandy. Cook for 30 minutes until the apples are soft. Leave to cool until cold. Add the brandy. Put into jars that you have sterilised by washing them extremely well and drying them in a low oven.
Pita Bread

- 500 g of white bread flour
- 350 ml of tepid water
- 1 tea spoon of dried yeast
- 1 tea spoon of salt.
Mix the flour and salt in a bowl. Dissolve the yeast to a small amount of water and leave for a few minutes. Add the yeasty water and the rest of water to the flour and mix into a dough with your hands. I them put in the food mixer with a dough hook for about 10 minutes but you can knead it with your hands for about the same amount of time.
Leave the dough in a clean oiled bowl covered with cling film for an hour or two. Now you can knock the dough back and divide it into about 15 small round balls. Leave of a well floured surface and keep covered with a slightly damp tea towel. The oven has to be very hot about 220 degrees C and put a flat baking tray in the oven to get it really hot too. Roll out two breads to less than 0.5 cm thick. They should be about the size of a small plate. Put them onto the hot baking tray and cook for between 3 – 4 minutes. Once done put them on a large plate and keep them wrapped in a tea towel. The pitas will puff up like balls and watching them do this never fails to give me pleasure. While one batch is cooking roll out the next two and carry on until you have a beautiful heap of pita breads.
Tuesday 28 January 2014
Chicken murag with rice
Having caused a bit of a rumpus with the simplest of all meals (scrambled egg) I feel like I am taking my life in my hands with this post. This dish sends my brother and I into raptures of nostalgia. Cooked by our grandmother it fills the house with smells of chicken and spices, it is essentially chicken soup with rice. I have found other versions of this in Claudia Roden’s Middle Eastern food book but none are quite the same as our version. My grandmother, Rachel grew up in Calcutta, her family were part of a small community of Jews who over the preceding 100 years had come to Calcutta from Baghdad and Syria. This recipe has clearly been influenced by this Indian and Middle Eastern background. My grandmother did not use stock for this soup just water. The chicken bones cook in the soup and its own stock is created. But when I have a good fine clear chicken and onion stock i thinkit adds to the flavour.
Its best on a cold night when you are feeling low or after a long walk when all you want is comfort food. I have given you the amount I tend to use for four people but I often double it since it tastes better the next day. I recall my grandmother used to top up the murag the next day with more potatoes and chicken added to the left over broth.
 For the murag Crush the Spices, (except the cardamom) finely slice the garlic and onion and add them to a pan with a splash of sunflower oil. As it starts to bubble add the chicken pieces and brown them off in the spice mix. After a few minutes add the chicken and onion stock and enough water to cover the chicken well (you want lots of broth). Add the cardamom when you add the liquid.
Its best on a cold night when you are feeling low or after a long walk when all you want is comfort food. I have given you the amount I tend to use for four people but I often double it since it tastes better the next day. I recall my grandmother used to top up the murag the next day with more potatoes and chicken added to the left over broth.
- 6 Chicken thighs on the bone and skin on
- Potatoes (you don’t want them too floury, they need to stay firm when boiled)
- Chicken and onion stock if you have homemade.
- 1 onion finely sliced
- 2 teaspoons of cumin seeds
- 2 teaspoons of corriander seeds
- 2 teaspoons of Ground turmeric
- 8 -10 Cardamom Pods
- 3 Garlic cloves
- Basmati Rice
I make a chicken stock by boiling up chicken bones and a couple of peeled and halved onions. If you don’t have any stock, just use water. The last thing you want is to use a stock cube which ruins the flavour.
Let the chicken, spices and chicken simmer for about 20 minutes or longer you want to the chicken to just fall off the bone then add about seven peeled and halved potatoes. (keep the potatoes quite large.) and simmer for another half and hour or so. The skin on the chicken will have started to come away, remove these from the pot and skim any fat from the top of the murag. Season to taste.
For the rice I was also taught to make rice by my grandmother. She did this always using the same pan. She did not measure out her rice, she put it in the bottom of the pan so it covered the bottom. She then added water so that if she put her elbow in the pan it would come up to the same height on her arm. Not hugely helpful if you have a smaller pan, different sizes arms etc! I subsequently found that the best way to guarantee fluffy rice every time is use the same amount of rice to water.
One good sized mug will make enough rice for two people. Rinse the rice well add it to the pan with some salt. Add the water, put the lid on the pan, bring it to the boil and as soon as it starts boiling (do not take the lid off) turn it down to low simmer. Let it cook for exactly ten minutes. Turn the heat off but do not take the lid off, leave it for a further ten minutes. Then remove the lid and hey presto perfect rice. This basic rice can used to make spicy rice but more of that in future posts.
How to eat chicken murag Take a large bowl, add a good spoonful of rice, then add plenty of soup with at least one bit of chicken and one potato per person. I challenge anyone to only have one serving.
scrambled eggs
Sunday morning, birthday breakfasts almost always start with scrambled egg. I was first shown how to make scrambled eggs by my father and have long been very clear about how I like them. Well meaning guests anxious to take their share of the cooking have offered to do scrambled egg their way… added cheese, even onion get very short shift in our house.
Since my orginal post on scrambled egg I have taken on board Joe and Rebecca's comment that scrambled eggs should not be made with cream or milk. I have tried it and this was seconded by Rowan!
The trick with scrambled eggs is book them slowly and don’t move them around too much. Take them off the heat before you think they are ready, they will continue to cook and most importantly of all have everyone sitting at the table ready to eat as son as they are ready.
Whisk the eggs with about half a small glass of milk with the salt and pepper. Put a frying pan (non stick avoid difficult washing up issues) on a low heat with a knob of butter. Once the butter has melted but not too hot add the eggs. Leave them on a low heat while you prepare the toast. Resist the temptation to stir it or turn the heat up. After abut 2 minutes gently move it around and leave it alone for another couple of minutes. Once it is creamy and soft take it off the heat and stir it a bit more. The egg should be cooked but soft. Dish up and enjoy.
Since my orginal post on scrambled egg I have taken on board Joe and Rebecca's comment that scrambled eggs should not be made with cream or milk. I have tried it and this was seconded by Rowan!
The trick with scrambled eggs is book them slowly and don’t move them around too much. Take them off the heat before you think they are ready, they will continue to cook and most importantly of all have everyone sitting at the table ready to eat as son as they are ready.
- Two eggs per person
- Salt and Pepper.
Whisk the eggs with about half a small glass of milk with the salt and pepper. Put a frying pan (non stick avoid difficult washing up issues) on a low heat with a knob of butter. Once the butter has melted but not too hot add the eggs. Leave them on a low heat while you prepare the toast. Resist the temptation to stir it or turn the heat up. After abut 2 minutes gently move it around and leave it alone for another couple of minutes. Once it is creamy and soft take it off the heat and stir it a bit more. The egg should be cooked but soft. Dish up and enjoy.
Subscribe to:
Posts (Atom)